Mounting an M.2 SSD to an RPi 5


On my slow journey to learn Kubernetes and create a home cluster with Raspberry Pis, I added additional storage to my RPi 5 using its PCIe port. After a slew of guides not quite matching my use case (not trying to boot from the SSD) and a long debugging session, I thought I'd document the process in a blog post.
Hardware
While researching how to add additional storage, or if I should buy a dedicated off-the-shelf NAS, I wanted something fast, large, and power efficient while avoiding vendor lock. The first three fit SSDs quite well (large sizes aren't terribly expensive these days), while the last one was trickier. Since I already owned a couple of RPi 5s, I ended up with the following items:
- Raspberry Pi 5
- Pimoroni NVME Base
- Inland 1TB QN450 NVME SSD (M-key)
- A cheap case stack for temporary housing
The neat thing about the Pimoroni NVME Base is that is supports a wide variety of SSDs including full sized 2280. There's an option to purchase it with a sure-to-be-compatible SSD, but since I live near a Micro Center I was able to find a better deal on an Inland SSD. Be sure to check the compatibility list on the Pimoroni page before buying an SSD.
The case stack listed lets me stack multiple Pis together and slightly alters the assembly. It's not tall enough for the added height of the NVME base, but you can easily use 2 levels of the stack on one Pi.
Assembly
The Pimoroni NVME base install guide is a useful reference for assembly. To adapt it to the linked case stack, I used some of the case standoffs with screws embedded rather than some of the NVME base screws. Here's a reference order-of-operations in place of the video:
- NVME + case standoffs into NVME base
- Insert M.2 screw + nuts and SSD
- PCIe ribbon into Pi
- PCIe ribbon into NVME base
- Screw NVME base into RPi
- Screw case components into combined assembly
When assembly is done, boot the Pi.
Mounting the SSD
Most of the setup time now goes towards formatting and mounting the SSD. The rest of this guide is the combination of the following guides:
- Pimoroni's instructions (PCIe 3 Mode)
- ThePiHut
- This beautiful StackExchange answer
- A ton of how-to-Linux googling
I performed the following in headless mode, where the Pi has already been given a suitable hostname. All of the following commands are assumed to be run from an SSH shell.
Configure PCIe 3 Mode
Edit the end of /boot/firmware/config.txt to look like the following:
[all]
dtparam=pciex1_gen=3
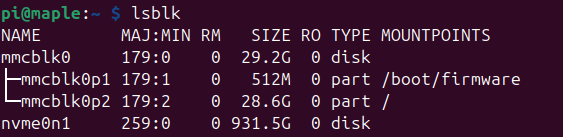
Reboot when done. Before formatting, we can verify the SSD is connected by checking for an entry with NVME in its name in lsblk.
Enable X11 Forwarding From root
To (most easily) format the SSD, we need to enable X11 forwarding and authorize it from root. If you're using a desktop on your RPi directly, skip this section.
About two pages down in /etc/ssh/sshd_config, make sure the X11 entries match the following:
X11Forwarding yes
#X11DisplayOffset 10
X11UseLocalhost no
Afterwards, run the following commands:
sudo systemctl restart sshdto restart the SSH service- Exit and SSH again with the
-Xflag for X11 xauth list $DISPLAYto find our current authentication cookie- Copy the printed line from the previous command
sudo suto switch to the root usertouch /root/.Xauthorityto ensure the Xauthority file existsxauth add [paste]to authenticate X11 from the root user
Complete the next section from root.
Format the SSD
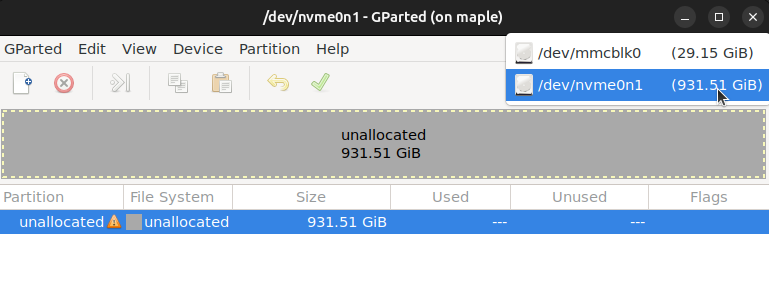

To format the SSD, we'll use gparted. Run the following commands:
apt-get updateapt-get install gpartedgparted
First, select the device connected SSD in the upper-right corner (it should have NVME in its name).
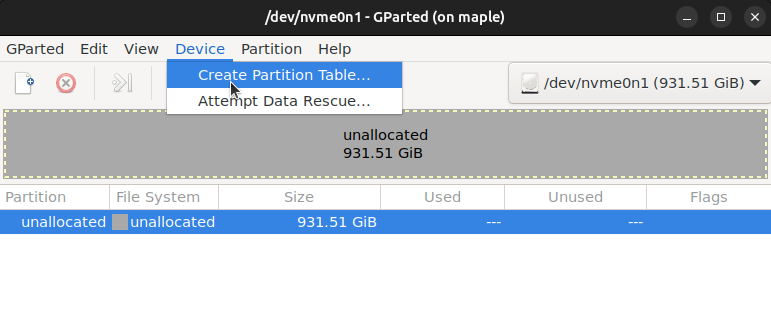
Then, create a partition table using the default settings (msdos).
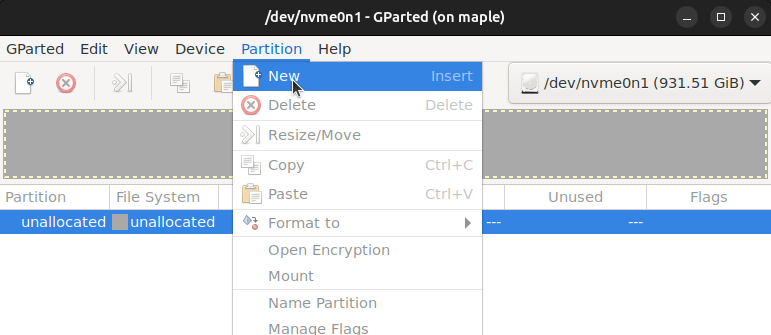
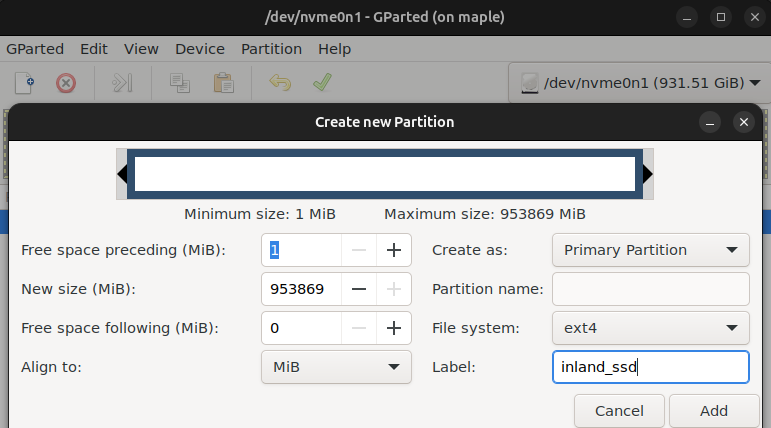
After that, create a new ext4 partition that fills the drive. Give it a meaningful label.
Lastly, press the green checkmark to apply the selected operations. Since we're using an SSD over a PCIe connection, this shouldn't take but a moment.
Manually Mount the SSD
exit from the root user if you were using it for gparted.
To test that everything is formatted, we'll first manually mount the drive.
lsblkto show our block devices; find the new partition device name, such asnvme0n1p1. Copy it.sudo mkdir -p /mnt/ssdto create a mount pointsudo mount /dev/[paste] /mnt/ssdto mount the drivesudo chown -R pi:pi /mnt/ssdto give thepiuser access to the SSD
If successful, we should see the drive with df -h:
/dev/nvme0n1p1 916G 32K 870G 1% /mnt/ssd
Automount the SSD
To ensure the drive is mounted on boot, we'll add it to /etc/fstab.
First, run blkid and copy the PARTUUID from the result. The relevant line should be recognizable as it starts with the same partition device name and your chosen partition label.
Next, append to /etc/fstab the following:
PARTUUID=9f594e17-01 /mnt/ssd ext4 defaults,nofail,x-systemd.automount 0 0
The defaults option provides sensible defaults, nofail ensures that the Pi can boot regardless of an issue mounting the SSD, and x-systemd.automount lets systemd handle the automount process, which I found both necessary for startup timings and useful for controlling other boot timings.
Systemd should create a new pair of startup services for the /etc/fstab (probably after a daemon reload, but we'll restart soon). Based on the /mnt/ssd mount point, the names should be mnt-ssd.automount and mnt-ssd.mount. You can use these to start the debugging process if the drives aren't mounting on boot. If you have other services that depend on the SSD being mounted (say, K3s), append the following lines to the [Unit] section of your service file. Example for K3s:
[Unit]
Description=Lightweight Kubernetes
Documentation=https://k3s.io
Wants=network-online.target
After=network-online.target
Requires=mnt-ssd.mount
After=mnt-ssd.mount
A sudo systemctl daemon-reload would apply the configuration, but regardless we'll restart the Pi now and confirm if the drive is present on df -h after boot.
Debugging
The following commands will help debug what's going on if the automount configuration was incorrectly specified:
lsblkblkiddf -hsystemctl status mnt-ssd.automountsystemctl status mnt-ssd.mountjournalctl -u mnt-ssd.automountjournalctl -u mnt-ssd.mountdmesg | grep -i mountjournalctl -xe
I'll refer the reader to Google to explain the usefulness of each command.
Summary
With all of the above completed, your Raspberry Pi should now have a speedy SSD connected to it!